Prerequisites
distortos comes with a complete build framework, which uses CMake exclusively. So for a project based on distortos you need just the following tools to configure and build it:
- CMake (version 3.7 or later);
- a build tool supported by CMake – the most recommended one is Ninja;
- arm-none-eabi bleeding-edge-toolchain (GCC version 5 or later);
CMake workflow
Build system of distortos follows CMake’s typical cross-compiling workflow, which means that you always have to use a so-called toolchain file. In distortos these files also serve another important purpose – they select the board which will be used by your application. Therefore the toolchain file for distortos is not architecture-specific – as you would expect – but board-specific.
If you are using a custom board or if your board is not already supported by distortos, you will need to generate all the required files. Separate article about board generation has more info about this process.
Minimal project
As an absolute minimum, a project with distortos has to contain these three things:
- folder with distortos sources,
CMakeLists.txtfile,- source file with
main().
Thus the simplest distortos-based project will look like this:
my-project
├── distortos
│   ├── cmake
│   ├── include
│   ├── source
│   ├── ...
│   ├── CMakeLists.txt
│   └── ...
├── CMakeLists.txt
└── main.cpp
The example above is kept simple for brevity and clarity, but obviously the source file doesn’t have to be named main.cpp and distortos doesn’t need to be placed in my-project/distortos. It can actually be located anywhere you want, even out of the folder of your project – so instead of my-project/distortos it could as well be in my-project/any/fancy/path/you/like or in /home/freddie/distortos.
But let’s get to something more important than naming – the contents of these files. To follow the spirit of the example, main.cpp is kept to an absolute minimum – just a loop which constantly calls distortos::ThisThread::sleepFor():
#include "distortos/ThisThread.hpp"

int main()
{
	while (1)
		distortos::ThisThread::sleepFor(std::chrono::seconds{1});
}
Shortest possible (and still usable) CMakeLists.txt is also pretty concise:
cmake_minimum_required(VERSION 3.7)
project(my-project)

add_subdirectory(distortos)

add_executable(my-project
		main.cpp)
target_link_libraries(my-project PRIVATE
		distortos::distortos)
distortosTargetLinkerScripts(my-project $ENV{DISTORTOS_LINKER_SCRIPT})

# optional:
distortosBin(my-project my-project.bin)
distortosDmp(my-project my-project.dmp)
distortosHex(my-project my-project.hex)
distortosLss(my-project my-project.lss)
distortosMap(my-project my-project.map)
distortosSize(my-project)
It could actually be even shorter, but this would hamper its usability. The last 6 lines – all the ones below # optional: comment – can be safely removed if you don’t need what they do (respectively: binary image of your executable, memory dump of the application, Intel HEX file with the firmware, assembly listing of the whole application, memory map file generated at link-time and report about memory usage of your code).
Configuring the build folder
Once you have the project set up as presented above, you can proceed to configuring the build folder. I use this phrase to describe a process where you create a build folder, initialize it with CMake and – optionally – edit some of available configuration options. After configuring the build folder, you can compile your application into a working executable.
There are a couple of things to note.
First of all, distortos explicitly forbids in-source builds. You must always build into a separate directory, a practice called (surprise!) out-of-source build.
You can call the build folder any way you like and place it anywhere you want. For simplicity of this article I will use my-project/output, but you are free to choose any other name and/or path, e.g. my-project/whatever, my-project/very/long/build/folder/path, /tmp/compile/it/here or /home/freddie/build.
For one project there may be multiple build folders, each with separate configuration. This way you can have both my-project/Debug and my-project/Release folders simultaneously. Or you can build the same application for multiple different boards. Or just anything you think of.
Configuring with console
Start the console and navigate to top-level directory of the project. Create an empty output build folder, then change current directory to the newly created folder. Let’s say you want to configure the build folder to use STM32F4DISCOVERY board – in this case CMake invocation to initialize it is cmake .. -DCMAKE_TOOLCHAIN_FILE=../distortos/source/board/ST_STM32F4DISCOVERY/Toolchain-ST_STM32F4DISCOVERY.cmake -GNinja. This invocation should follow cmake $PROJECT -DCMAKE_TOOLCHAIN_FILE=$TOOLCHAIN_FILE -GNinja pattern, where $PROJECT is the path to project’s top-level directory and $TOOLCHAIN_FILE is the path to selected toolchain file, both paths as seen from within the build folder.
Configuring with cmake-gui
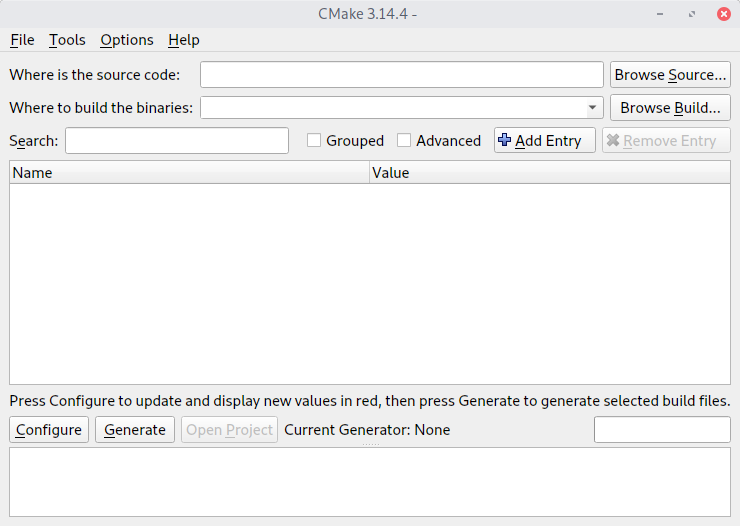
Instead of initializing the build folder with console, it is also possible to do it directly with CMake GUI (cmake-gui). After starting the application, make sure that it looks as on the right screenshot – both top text boxes should be empty. If they are not, just delete their contents.
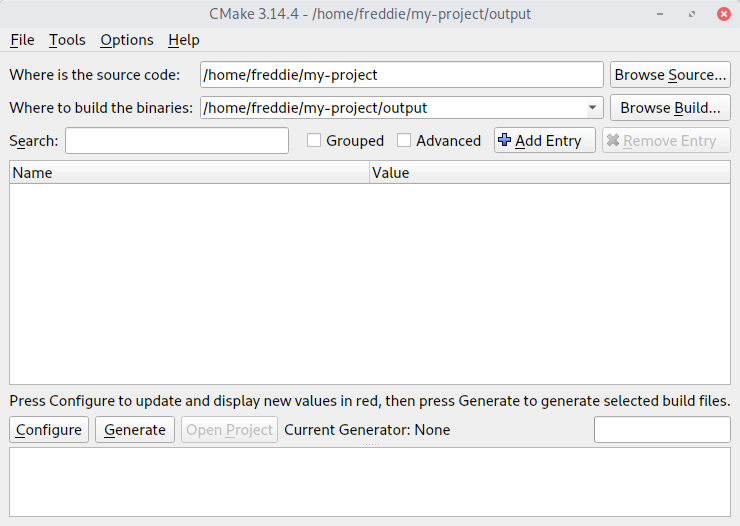
Click on Browse Source… and navigate to top-level directory of the project. Then click on Browse Build… and navigate to the folder where you want to build the project (you will have to create it – there will be a button to do it in the browser).


When both folders are specified, press Configure. In the dialog which appears choose the generator – recommended one is Ninja – and make sure that Specify toolchain file for cross-compiling is selected. During the next step browse to the toolchain file, for example my-project/distortos/source/board/ST_STM32F4DISCOVERY/Toolchain-ST_STM32F4DISCOVERY.cmake, and click Finish.
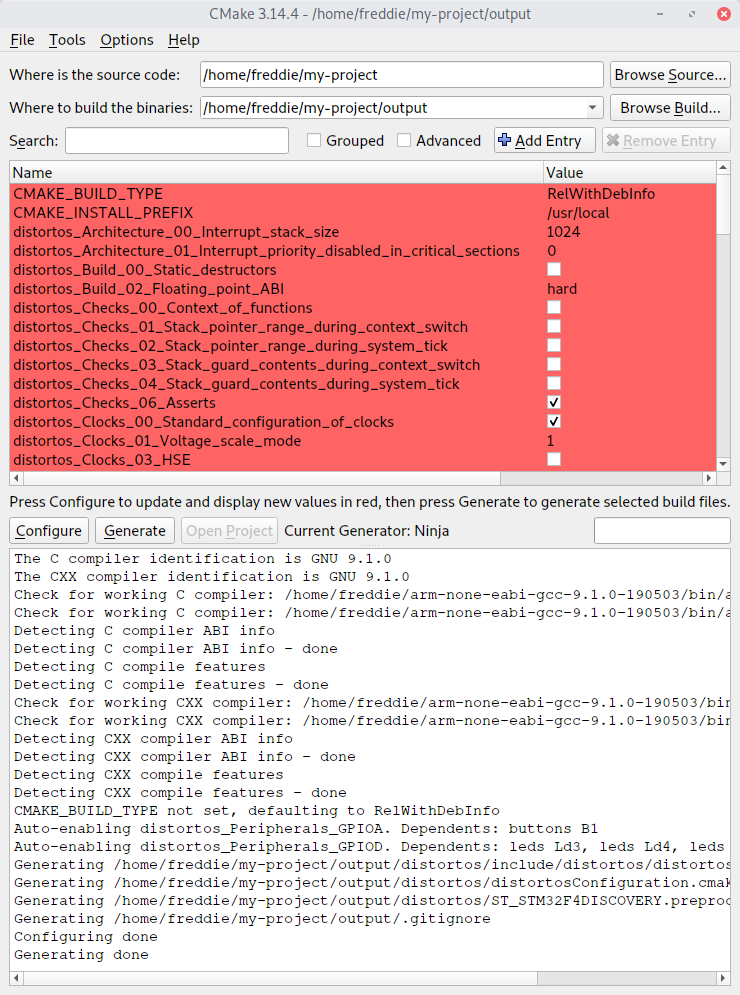
New project options will appear in the middle part of the window (initially with red background) while at the bottom you will see the status log of the process. Press Generate and if no errors are displayed in the status log (last line is Generating done) you can close the window.
Editing the configuration
At any time you may edit most of the options of your project. There is no need to start from scratch when you just want to modify some of the parameters (e.g. stack size for main thread) while leaving others unchanged (like clock configuration).
The recommended way to modify project configuration is via cmake-gui. You can start it from within the build folder with cmake-gui .. (or more generally with cmake-gui $PROJECT, where $PROJECT is the path to project’s top-level directory as seen from within the build folder). It is also possible to start CMake GUI and then enter paths to top-level directory of the project and build folder into two top textboxes (Where is the source code and Where to build the binaries) – either manually or with Browse Source… and Browse Build… buttons respectively.
After you change a setting, new options may appear or existing ones may be removed/modified. Therefore it is advisable to click Configure after each change. New items are initially displayed on top and have red background to highlight them.
Whenever you are not sure about any of the options, just hoover your mouse over it in cmake-gui to see a (hopefully) helpful tooltip.
However please note that CMake allows you to modify some options which you really don’t want to change. The main example is the toolchain file (CMAKE_TOOLCHAIN_FILE) – even though it is possible to change it for a configured project, please don’t ever do that. This means that if you want to reconfigure your project to use a different board, you will have to make a fresh start with an empty build folder.
CMake also has a concept of advanced options, which are visible only if Advanced checkbox is selected in cmake-gui. Some of them are safe to change (assuming you know what you are doing):
CMAKE_BUILD_TYPE,CMAKE_..._FLAGSandCMAKE_..._FLAGS_...,CMAKE_EXPORT_COMPILE_COMMANDS,CMAKE_VERBOSE_MAKEFILE.
Other advanced options not listed above should never be changed – either because it will result in a broken configuration or because they do nothing for an embedded project.
Building the project
To build the application, just execute ninja from within the build folder. If you want to see all commands executed while building, use ninja -v.
Saved configuration
Each time you modify any project option, CMake saves complete configuration in $BUILD/$DISTORTOS/distortosConfiguration.cmake, where $BUILD is the path to build folder and $DISTORTOS is (in most cases) the relative path to distortos within the project. In case of example project from this article this would be my-project/output/distortos/distortosConfiguration.cmake). This file can be used to easily back-up (i.e. you can copy it, commit it into your version control system and ship with the project) and restore project configuration. Thus anyone willing to build your project won’t have to deal with any of the configuration options at all.
Let’s say that the contents of your project’s release look like this:
my-project
├── distortos
│   ├── cmake
│   ├── include
│   ├── source
│   ├── ...
│   ├── CMakeLists.txt
│   └── ...
├── CMakeLists.txt
├── distortosConfiguration.cmake
└── main.cpp
The whole procedure to restore the configuration from my-project/distortosConfiguration.cmake and build the project looks like this:
- Create empty
my-project/outputbuild folder. - From within build folder execute
cmake -C../distortosConfiguration.cmake .. -GNinja(annotated invocation iscmake -C$SAVED_CONFIGURATION $PROJECT -GNinja, where$SAVED_CONFIGURATIONis the path todistortosConfiguration.cmakefile and$PROJECTis the path to project’s top-level directory, both paths as seen from within the build folder). - Build the project.
It is also possible to use configuration from one project in another one, assuming that both of them use exactly the same board (thus the same toolchain file). This may be useful when – for example – you don’t want to think again about proper clock configuration and just want to start faster or to import some of existing test configurations directly from distortos/configurations folder.
The process is straightforward if relative path to distortos within both projects is identical. It gets slightly trickier otherwise – e.g. when source project had source-project/external/distortos and the target project has target-project/3rd-party/distortos. The only twist is that you need to supply the path to distortos within the project via DISTORTOS_PATH environment variable. One of the ways to do it is to prepend CMake invocation with the variable assignment like this DISTORTOS_PATH=3rd-party/distortos cmake -C....
Common CMake pitfall
When using saved configurations (distortosConfiguration.cmake) to configure the build folder, CMake will NOT fail immediately if it cannot find this file. It will instead continue to configure the build folder and fail near the end of the process, as no toolchain file was provided. If saved configuration would be found, it would specify the toolchain file and all other important settings.
$ cmake -C../invalid/path/distortosConfiguration.cmake .. -GNinja
loading initial cache file ../invalid/path/distortosConfiguration.cmake
CMake Error: Error processing file: ../invalid/path/distortosConfiguration.cmake
-- The C compiler identification is GNU 8.3.0
-- The CXX compiler identification is GNU 8.3.0
-- Check for working C compiler: /usr/bin/cc
-- Check for working C compiler: /usr/bin/cc -- works
-- Detecting C compiler ABI info
-- Detecting C compiler ABI info - done
-- Detecting C compile features
-- Detecting C compile features - done
-- Check for working CXX compiler: /usr/bin/c++
-- Check for working CXX compiler: /usr/bin/c++ -- works
-- Detecting CXX compiler ABI info
-- Detecting CXX compiler ABI info - done
-- Detecting CXX compile features
-- Detecting CXX compile features - done
CMake Error at distortos/CMakeLists.txt:19 (distortosSetConfiguration):
  Unknown CMake command "distortosSetConfiguration".

-- Configuring incomplete, errors occurred!
See also "/home/freddie/my-project/output/CMakeFiles/CMakeOutput.log".
Upon closer inspection, you will notice that instead of detecting an arm-none-eabi-gcc compiler, CMake found your system’s native compiler /usr/bin/cc. Even if you now provide correct path to the saved configuration, the process will not succeed – at this stage CMake ignores this file.
$ cmake -C../distortosConfiguration.cmake .. -GNinja
loading initial cache file ../distortosConfiguration.cmake
CMake Error at distortos/CMakeLists.txt:19 (distortosSetConfiguration):
  Unknown CMake command "distortosSetConfiguration".

-- Configuring incomplete, errors occurred!
See also "/home/freddie/my-project/output/CMakeFiles/CMakeOutput.log".
Such partially initialized build folder is broken beyond repair and cannot be fixed in any way. The only solution is to delete it and start from scratch.
$ cd ..
$ rm -rf output/
$ mkdir output
$ cd output/
$ cmake -C../distortosConfiguration.cmake .. -GNinja
loading initial cache file ../distortosConfiguration.cmake
-- The C compiler identification is GNU 9.1.0
-- The CXX compiler identification is GNU 9.1.0
-- Check for working C compiler: /home/freddie/arm-none-eabi-gcc-9.1.0-190503/bin/arm-none-eabi-gcc
-- Check for working C compiler: /home/freddie/arm-none-eabi-gcc-9.1.0-190503/bin/arm-none-eabi-gcc -- works
-- Detecting C compiler ABI info
-- Detecting C compiler ABI info - done
-- Detecting C compile features
-- Detecting C compile features - done
-- Check for working CXX compiler: /home/freddie/arm-none-eabi-gcc-9.1.0-190503/bin/arm-none-eabi-g++
-- Check for working CXX compiler: /home/freddie/arm-none-eabi-gcc-9.1.0-190503/bin/arm-none-eabi-g++ -- works
-- Detecting CXX compiler ABI info
-- Detecting CXX compiler ABI info - done
-- Detecting CXX compile features
-- Detecting CXX compile features - done
-- Generating /home/freddie/my-project/output/distortos/include/distortos/distortosConfiguration.h
-- Generating /home/freddie/my-project/output/distortos/distortosConfiguration.cmake
-- Generating /home/freddie/my-project/output/distortos/ST_STM32F4DISCOVERY.preprocessed.ld
-- Generating /home/freddie/my-project/output/.gitignore
-- Configuring done
-- Generating done
-- Build files have been written to: /home/freddie/my-project/output